Back to Facility Schedule Main Menu
Canceling an invoice is a two step process. First, make sure any payments that have previously been posted to the invoice are removed. Then, as you cancel the invoice, you will also need to delete any charges that are listed on it. These steps are important because you do not want incorrect payments or outstanding charges to be associated with an organization.
How to Delete a Payment
- Click on the List link in the Actions Menu.
- Click the Payments link.
- You can sort the list in ascending or descending order by clicking on the gray box next to Invoice No.
- Click on the dollar amount under the Received Payments heading to access the Update Payment screen.

-
Click the Delete button at the bottom of the screen to remove the payment.
How to Cancel an Invoice
Once the payments have been deleted, you can proceed with canceling an invoice.
- Type the invoice number into the Search for box and click Go. This will take you to the Update Invoice page.
- Change the Invoice Status to Cancel or Void.
- Scroll down the page and click on Save.
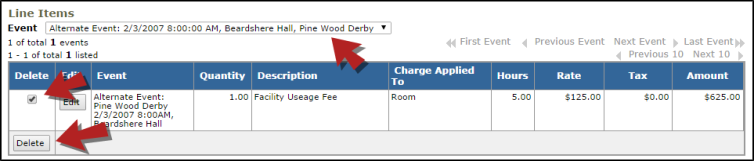
- Scroll down to the Line Items section. If the schedule you are working with has multiple dates, select one date at a time from the Event drop down menu.
- Check the box under the Delete heading.
- Click on the Delete button to remove the charges. Continue this process until Grand Total, Total Payments and Balance Due all read $0.00.